Note
For more details on each profile, please visit Bluetooth official website.
For more details on each profile, please visit Bluetooth official website.
This page provides a step-by-step guide for how to use the Bluetooth functions in webOS OSE.
Bluetooth is a technology that enables nearby electronic devices to connect wirelessly to each other. Using Bluetooth, you can implement applications such as wirelessly sending and receiving data or connecting audio devices.
There are many profiles to standardize how Bluetooth devices communicate with each other. So you must use a proper profile for each application’s purpose. webOS OSE supports some of the profiles through the LS2 APIs. See Supported Profiles to check the profiles supported by webOS OSE.
webOS OSE also provides the common method categories that are commonly used in several profiles. See Common Methods for details.
Before diving into the details, we strongly recommend you to familiarize yourself with the following key terms related to Bluetooth.
To test the whole Bluetooth profiles on webOS, you need the followings:
This category is used to set or get the status of a webOS OSE device. Methods in this category can be used for multiple Bluetooth profiles.
luna-send -f -n 1 luna://com.webos.service.bluetooth2/adapter/setState '{"powered":true}'

# Example return for a successful call
{
    "adapterAddress": "b8:27:eb:a4:5c:4e", # Bluetooth MAC address of the webOS device
    "returnValue": true
}

# Example return for a failed call
{
    "errorCode":112,
    "returnValue":false,
    "errorText":"Failed to change bluetooth power status"
}
This category is used to search for nearby Bluetooth devices and to support connection with webOS OSE devices. Methods in this category can be used for multiple Bluetooth profiles.
Turn Bluetooth on.
luna-send -f -n 1 luna://com.webos.service.bluetooth2/adapter/setState '{"powered":true}'

# Example return for a successful call
{
    "adapterAddress": "b8:27:eb:a4:5c:4e", # Bluetooth MAC address of the webOS device
    "returnValue": true
}
Set a specific Bluetooth device as trusted device using the following command.
# For "address", use a Bluetooth MAC address of the target device.
luna-send -f -n 1 luna://com.webos.service.bluetooth2/device/setState '{"address":"f4:42:8f:3d:e4:ec", "trusted":true}'

# Example return for a successful call:
{
   "returnValue":true
}
This category is used for advertising or for scanning the BLE devices. Methods in this category are used in other BLE profiles, such as GATT.
First, set up your smartphone as an advertising device.
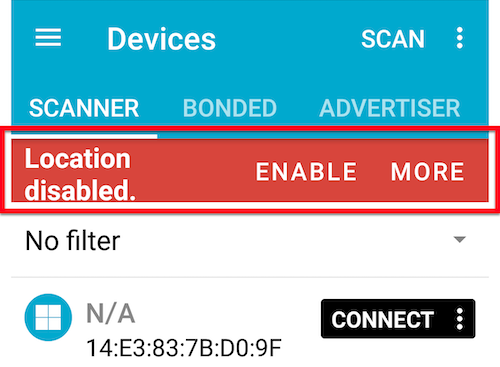
Run the nRF Connect for Mobile app.
If the location option is disabled, a pop-up message will be displayed on the top of the screen. Enable the location option on your smartphone.
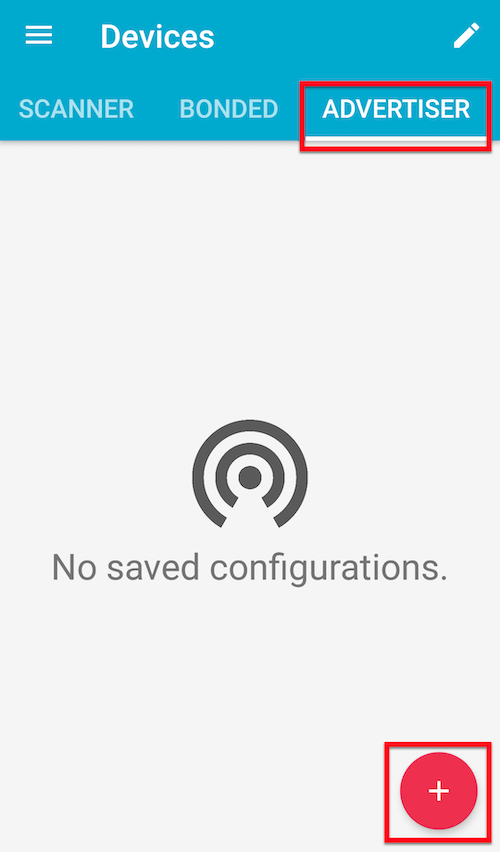
Tab ADVERTISER and plus(+) button.
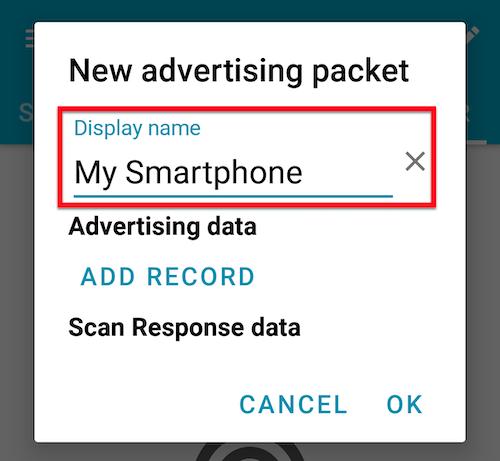
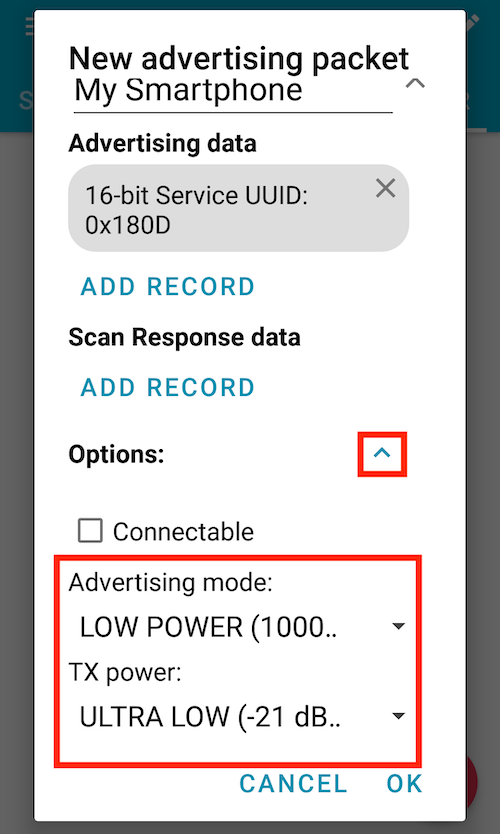
Set the display name.
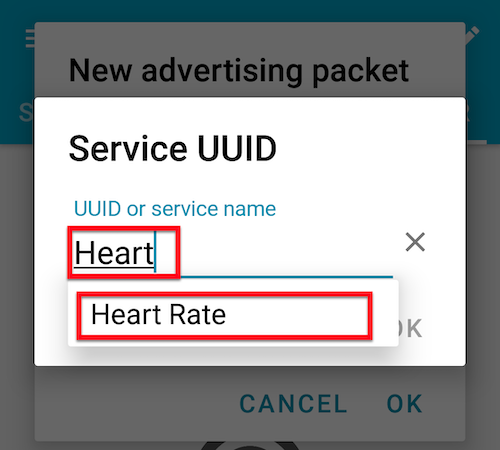
Tab Advertising data > ADD RECORD and Service UUID.
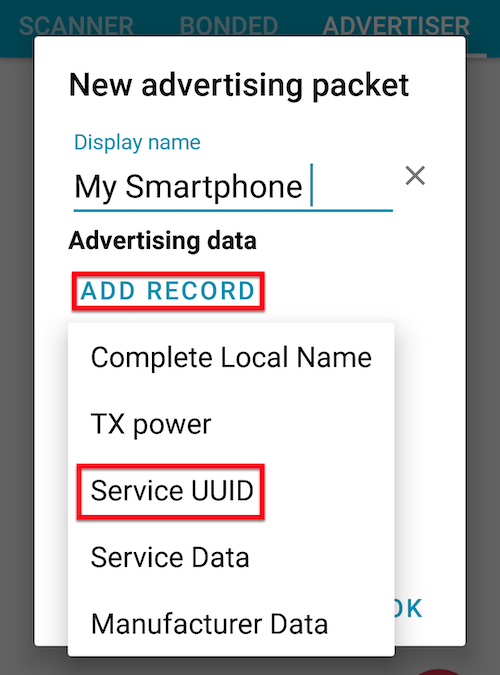
Then Service UUID pop-up will be displayed.
Scroll down and tab the Options dropdown menu.
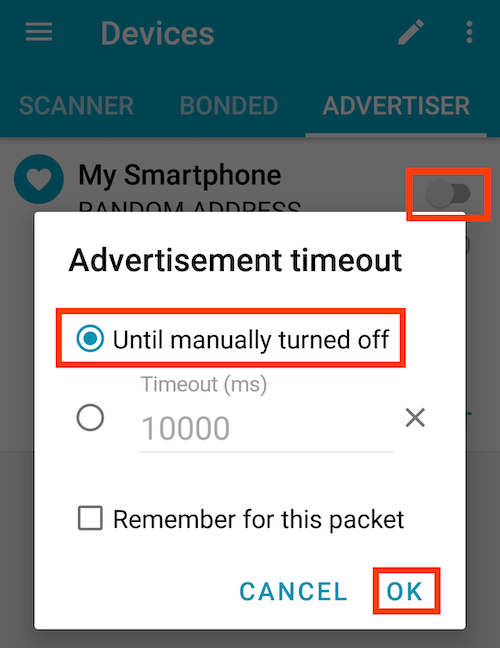
Activate the toggle button on the right side of the device list. Then start to advertise with Until manually turned off option.
Now it’s time to scan the advertising device using webOS device.
Turn Bluetooth on.
luna-send -f -n 1 luna://com.webos.service.bluetooth2/adapter/setState '{"powered":true}'

# Example return for a successful call
{
    "adapterAddress": "b8:27:eb:a4:5c:4e", # Bluetooth MAC address of the webOS device
    "returnValue": true
}
Start to scan the peripheral device.
# For "uuid", use the service UUID of the advertising device. (your smartphone)
luna-send -i -f luna://com.webos.service.bluetooth2/le/startScan '{"serviceUuid":{"uuid":"0000180d-0000-1000-8000-00805f9b34fb"},"subscribe":true}'

# Example return for a successful call
{
    "subscribed": true,
    "adapterAddress": "b8:27:eb:a4:5c:4e",
    "returnValue": true
}

# Subscription return example (Smartphone is detected by webOS device.)
{
    "returnValue": true,
    "device": {
        "classOfDevice": 0,
        "blocked": false,
        "scanRecord": [
        ],
        "serviceClasses": [
        ],
        "paired": false,
        "name": "Heart Rate",
        "pairing": false,
        "rssi": -60,
        "adapterAddress": "",
        "trusted": false,
        "typeOfDevice": "ble",
        "address": "44:18:aa:e9:3e:9f",
        "connectedProfiles": [
        ],

        ...

    }
}
Turn Bluetooth on.
luna-send -f -n 1 luna://com.webos.service.bluetooth2/adapter/setState '{"powered":true}'

# Example return for a successful call
{
    "adapterAddress": "b8:27:eb:a4:5c:4e", # Bluetooth MAC address of the webOS device
    "returnValue": true
}
Set a name of the webOS device.
luna-send -f -n 1 luna://com.webos.service.bluetooth2/adapter/setState '{"name":"advertisingTest"}'

# Example return for a successful call
{
    "adapterAddress": "b8:27:eb:a4:5c:4e", # Bluetooth MAC address of the webOS device
    "returnValue": true
}
Start to advertise using the webOS device.
# Start to advertise. Most of the parameters are optional.
luna-send -i -f luna://com.webos.service.bluetooth2/le/startAdvertising '{"subscribe":true,"advertiseData":{"manufacturerData":[11,22,33,44],"includeTxPower":true,"services":[{"uuid":"FEB8","data":[7,8,9,0]}],"includeName":false},"scanResponse":{"includeName":true}}'

# Example return for a successful call
{
    "adapterAddress":"b8:27:eb:a4:5c:4e",
    "advertiserId": 1,   # Shows how many times the startAdvertising method has been performed on the current device.
    "returnValue": true
}
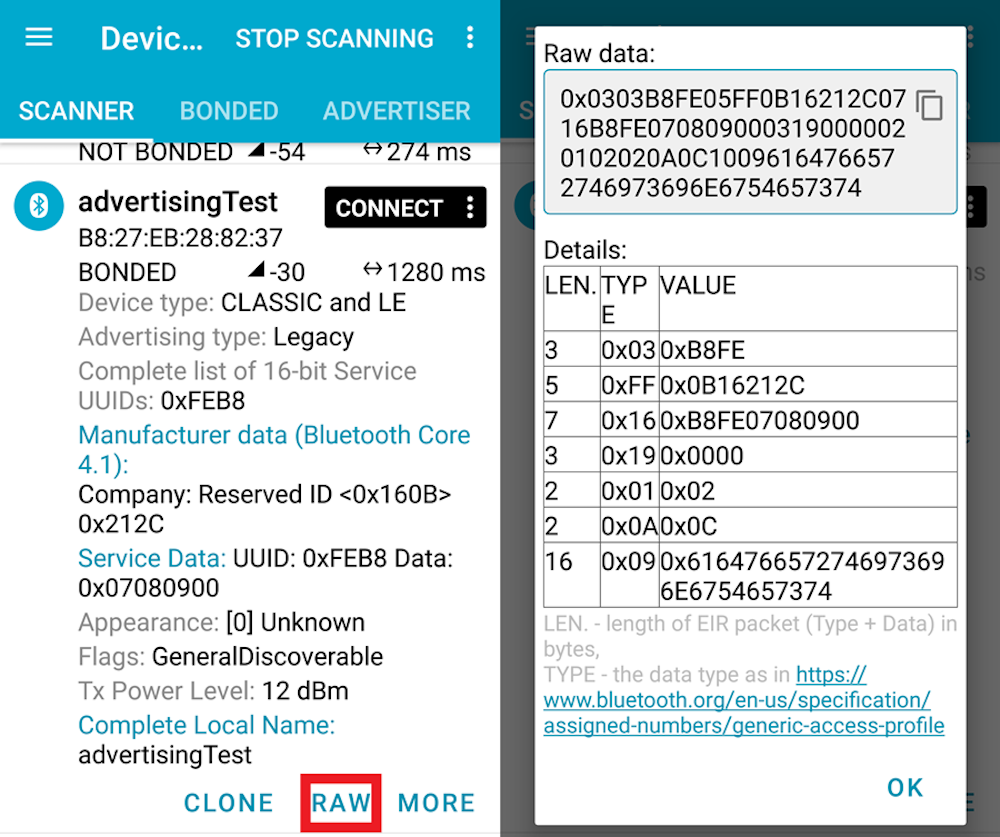
Then scan the webOS device using the smartphone.
Run the nRF Connect for Mobile app.
Tab SCAN in the SCANNER tab. After a while, a list of nearby BLE devices will be displayed. If you want to more details about each device, tab the device you want.
This profile is to stream high-quality audio files through a Bluetooth connection. Using this profile, you can play music on your Bluetooth devices, such as a headset or speaker.
A2DP profile is often used together with the AVRCP profile for remote control. In webOS OSE, if an A2DP profile is set, an AVRCP connection is also set automatically.
Power on your Bluetooth speaker.
Turn Bluetooth on.
luna-send -f -n 1 luna://com.webos.service.bluetooth2/adapter/setState '{"powered":true}'

# Example return for a successful call
{
    "adapterAddress": "b8:27:eb:a4:5c:4e", # Bluetooth MAC address of the webOS device
    "returnValue": true
}
Discover nearby Bluetooth devices
# Start to discover
luna-send -f -n 1 luna://com.webos.service.bluetooth2/adapter/startDiscovery '{}'

# Example return for a successful call
{
    "adapterAddress": "b8:27:eb:a4:5c:4e", # Bluetooth MAC address of the webOS device
    "returnValue": true
}
Find your Bluetooth speaker and note down the “address” value. You can use the grep command to simplify the list.
# Check the list of nearby Bluetooth devices

# Step 1. Display only "name" property
luna-send -f -n 1 luna://com.webos.service.bluetooth2/device/getStatus '{}' | grep "name"
            "name": "[LG] webOS TV UN7850GNA",
            "name": "[LG] webOS TV UJ6680",
            "name": "raspberrypi4",
            "name": "Sound Drum",             # Find the name of your Bluetooth speaker
            "name": "LG NP5550(12)",

# Step 2. Get more detailed information using the name from the step 1.
luna-send -f -n 1 luna://com.webos.service.bluetooth2/device/getStatus '{}' | grep "Galaxy A30" -C 2
            "pairing": false,
            "rssi": -34,
            "name": "Sound Drum",
            "address": "13:50:5a:a7:f5:da", # Bluetooth MAC address of the speaker. Note down this value.
            "paired": true,
Quit the discovery.
luna-send -f -n 1 luna://com.webos.service.bluetooth2/adapter/cancelDiscovery '{}'

# Example return for a successful call
{
    "adapterAddress": "b8:27:eb:a4:5c:4e", # Bluetooth MAC address of the webOS device
    "returnValue": true
}
Pair the webOS device with your Bluetooth speaker. After "request": "endPairing" shows, you can quit the process. (Press Ctrl + C.)
# For "address", use the value from the step 4.
luna-send -i -f luna://com.webos.service.bluetooth2/adapter/pair '{"subscribe":true, "address": "13:50:5a:a7:f5:da"}'

# Example return for a successful call
{
    "adapterAddress": "b8:27:eb:a4:5c:4e",
    "subscribed": true,
    "returnValue": true
}
{
    "adapterAddress": "b8:27:eb:a4:5c:4e",
    "subscribed": false,
    "returnValue": true,
    "request": "endPairing" # After this message is displayed, you can close this shell.
}
Open a new shell and connect the webOS device with your Bluetooth speaker. You must keep this shell open while using the A2DP profile.
# For "address", use the value from the step 4.
luna-send -i -f luna://com.webos.service.bluetooth2/a2dp/connect '{"address": "13:50:5a:a7:f5:da"}'

# Example return for a successful call
{
    "address": "13:50:5a:a7:f5:da",
    "subscribed": false,
    "adapterAddress": "b8:27:eb:a4:5c:4e",
    "returnValue": true
}
Open a new shell to check the A2DP connection. You can check the playing status using the getStatus method.
# For "address", use the value from the step 4.
luna-send -i -f luna://com.webos.service.bluetooth2/a2dp/getStatus '{"address": "13:50:5a:a7:f5:da"}'

# Example return for a successful call
{
    "playing": false,
    "adapterAddress": "b8:27:eb:a4:5c:4e",
    "address": "13:50:5a:a7:f5:da",
    "connected": true,    # Make sure this value is true.
    "subscribed": false,
    "returnValue": true,
    "connecting": false
}

# This return will be displayed when the webOS device plays an audio file.
{
    "playing": true,        # This value changes according to the playing status of the webOS device.
    "adapterAddress": "b8:27:eb:a4:5c:4e",
    "address": "13:50:5a:a7:f5:da",
    "connected": true,
    "subscribed": false,
    "returnValue": true,
    "connecting": false
}
This profile is to control the remote Bluetooth devices. Using this profile, you can use the remote controlling functions such as play/pause and fast forward/rewind. In webOS OSE, if an A2DP connection is established, an AVRCP connection is also established automatically.
Connect the speaker with the webOS device using A2DP profile. You must keep the shell open (which is running a2dp/connect method) while using the AVRCP profile.
Open a new shell and check the status of the AVRCP connection. You can check the AVRCP connection already has been established.
# For "address", use the "address" value of the A2DP connection.
luna-send -i -f luna://com.webos.service.bluetooth2/avrcp/getStatus '{"subscribe":true, "address": "13:50:5a:a7:f5:da"}'

# Example return for a successful call
{
    "adapterAddress": "b8:27:eb:a4:5c:4e",
    "address": "13:50:5a:a7:f5:da",
    "connected": true,
    "subscribed": true,
    "returnValue": true,
    "connecting": false
}
Execute the method for testing passthrough commands. You must keep this shell open (#1 shell) while testing the passthrough commands.
# Check passthrough commands. For "address", use the "address" value of the A2DP connection.
luna-send -i -f luna://com.webos.service.bluetooth2/avrcp/recievePassThroughCommand '{"subscribe":true, "address": "13:50:5a:a7:f5:da"}'

# Example return for a successful call
{

    "address": "13:50:5a:a7:f5:da",
    "subscribed": true,
    "adapterAddress": "b8:27:eb:a4:5c:4e",
    "returnValue": true
}
Press any control button of your Bluetooth speaker. Your key inputs will be sended as return messages on the #1 shell.
# Check passthrough command in #1 Shell.

# Press and release the "next" button.
{
    "keyStatus": "pressed",
    "keyCode": "next",
    "adapterAddress": "b8:27:eb:a4:5c:4e",
    "subscribed": true,
    "address": "13:50:5a:a7:f5:da",
    "returnValue": true
}
{
    "keyStatus": "released",
    "keyCode": "next",
    "adapterAddress": "b8:27:eb:a4:5c:4e",
    "subscribed": true,
    "address": "13:50:5a:a7:f5:da",
    "returnValue": true
}

# Example return for a successful call
{
    "keyStatus": "pressed",
    "keyCode": "play",
    "adapterAddress": "b8:27:eb:a4:5c:4e",
    "subscribed": true,
    "address": "13:50:5a:a7:f5:da",
    "returnValue": true
}
{
    "keyStatus": "released",
    "keyCode": "play",
    "adapterAddress": "b8:27:eb:a4:5c:4e",
    "subscribed": true,
    "address": "13:50:5a:a7:f5:da",
    "returnValue": true
}
This profile standardizes the way BLE devices exchange data.
Turn Bluetooth on.
luna-send -f -n 1 luna://com.webos.service.bluetooth2/adapter/setState '{"powered":true}'

# Example return for a successful call
{
    "adapterAddress": "b8:27:eb:a4:5c:4e", # Bluetooth MAC address of the webOS device
    "returnValue": true
}
Set the name for the GATT server.
luna-send -f -n 1 luna://com.webos.service.bluetooth2/adapter/setState '{"name":"gattServerTest"}'

# Example return for a successful call
{
    "adapterAddress": "b8:27:eb:a4:5c:4e", # Bluetooth MAC address of the webOS device
    "returnValue": true
}
Create the GATT server. Note down the serverId value.
# Create a new server
luna-send -f -n 1 luna://com.webos.service.bluetooth2/gatt/openServer '{}'

# Example return for a successful call
{
    "adapterAddress": "b8:27:eb:a4:5c:4e",
    "returnValue": true,
    "serverId":"001"    # Shows how many times GATT server has been opened on the current device. Note down this value.
}
Add a service to the GATT server. Use the service’s UUID (feb8) and characteristic’s UUID (2ab7) in this example.
# Add a service. For "serverId", use the value from the step 3.
luna-send -f -n 1 luna://com.webos.service.bluetooth2/gatt/addService '{"serverId":"001", "service":"0000feb8-0000-1000-8000-00805f9b34fb","type":"primary","includes":[], "characteristics":[{"characteristic":"00002ab7-0000-1000-8000-00805f9b34fb","properties":{"broadcast":false,"read":true,"indicate":true,"write":true,"notify":false},"permissions":{"read":true,"write":true}, "value":{"bytes":[]},"descriptors":[{"descriptor":"00002ab7-0000-1000-8000-00805f9b34fb","value":{"bytes":[0]}}]}]}'

# Example return for a successful call
{
    "adapterAddress": "b8:27:eb:a4:5c:4e",
    "returnValue": true,
    "serverId":"001"
}
Advertise the server. Keep this shell open. (#1 shell)
# Start to advertise. Most of the parameters are optional.
luna-send -i -f luna://com.webos.service.bluetooth2/le/startAdvertising '{"subscribe":true,"advertiseData":{"manufacturerData":[11,22,33,44],"proprietaryData":[{"type":27,"data":[55,66,77,88]}],"includeTxPower":true,"services":[{"uuid":"FEB8","data":[7,8,9,0]}],"includeName":false},"scanResponse":{"includeName":true}}'

# Example return for a successful call
{
    "adapterAddress":"b8:27:eb:a4:5c:4e",
    "advertiserId": 2,   # Shows how many times advertising has been performed on the current device.
    "returnValue": true
}
Go to your smartphone and run the nRF Connect for Mobile app.
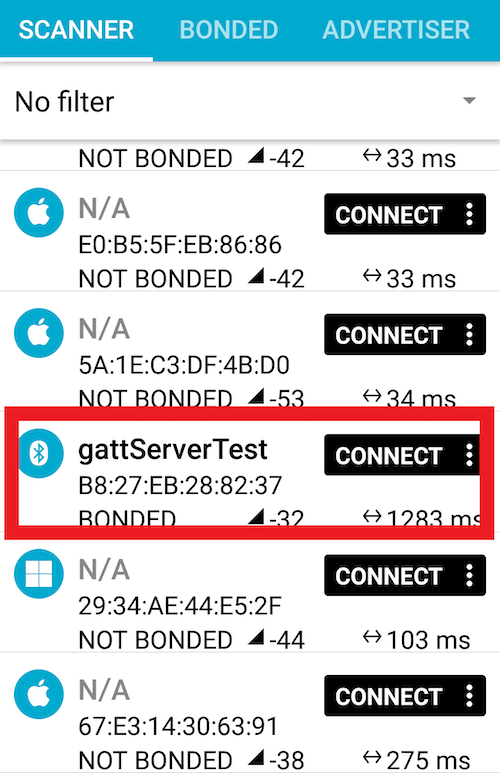
Tab SCAN in SCANNER tab. After a while, the GATT server will be displayed in the list. Tab CONNECT.
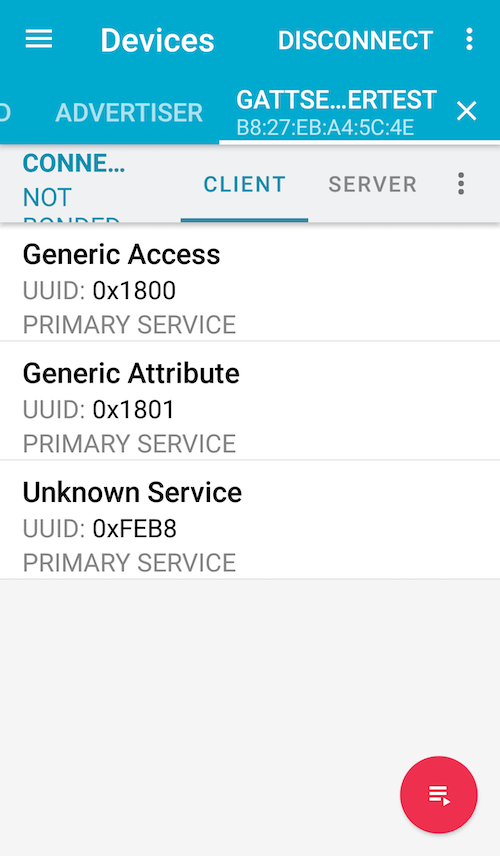
If the connection is established successfully, a list of services will be displayed in the GATT server tab.
Go back to the webOS device and open a new shell to check the service status.
# Check the status of the service.
luna-send -f -n 1 luna://com.webos.service.bluetooth2/gatt/getServices '{"adapterAddress": "b8:27:eb:a4:5c:4e"}'

# Example return for a successful call
{
    "adapterAddress": "b8:27:eb:a4:5c:4e",
    "returnValue": true,
    "services": [
        {
            "characteristics": [
                {
                    # The rest is omitted.
            ]
        }
    ]
}
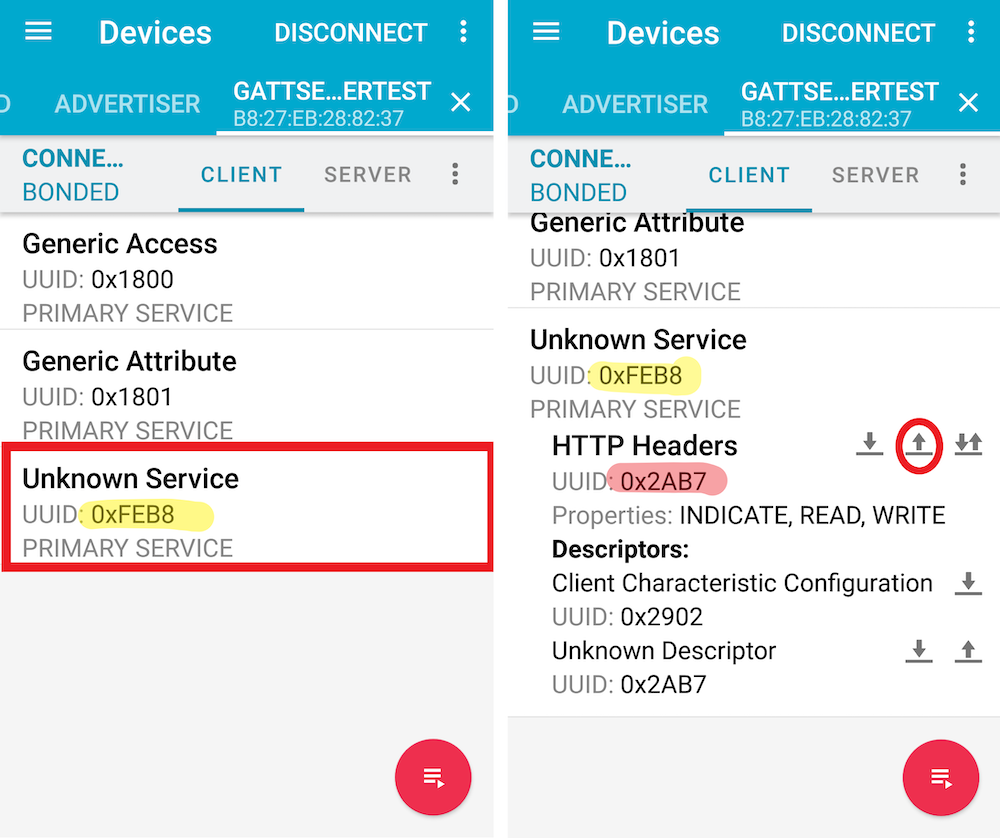
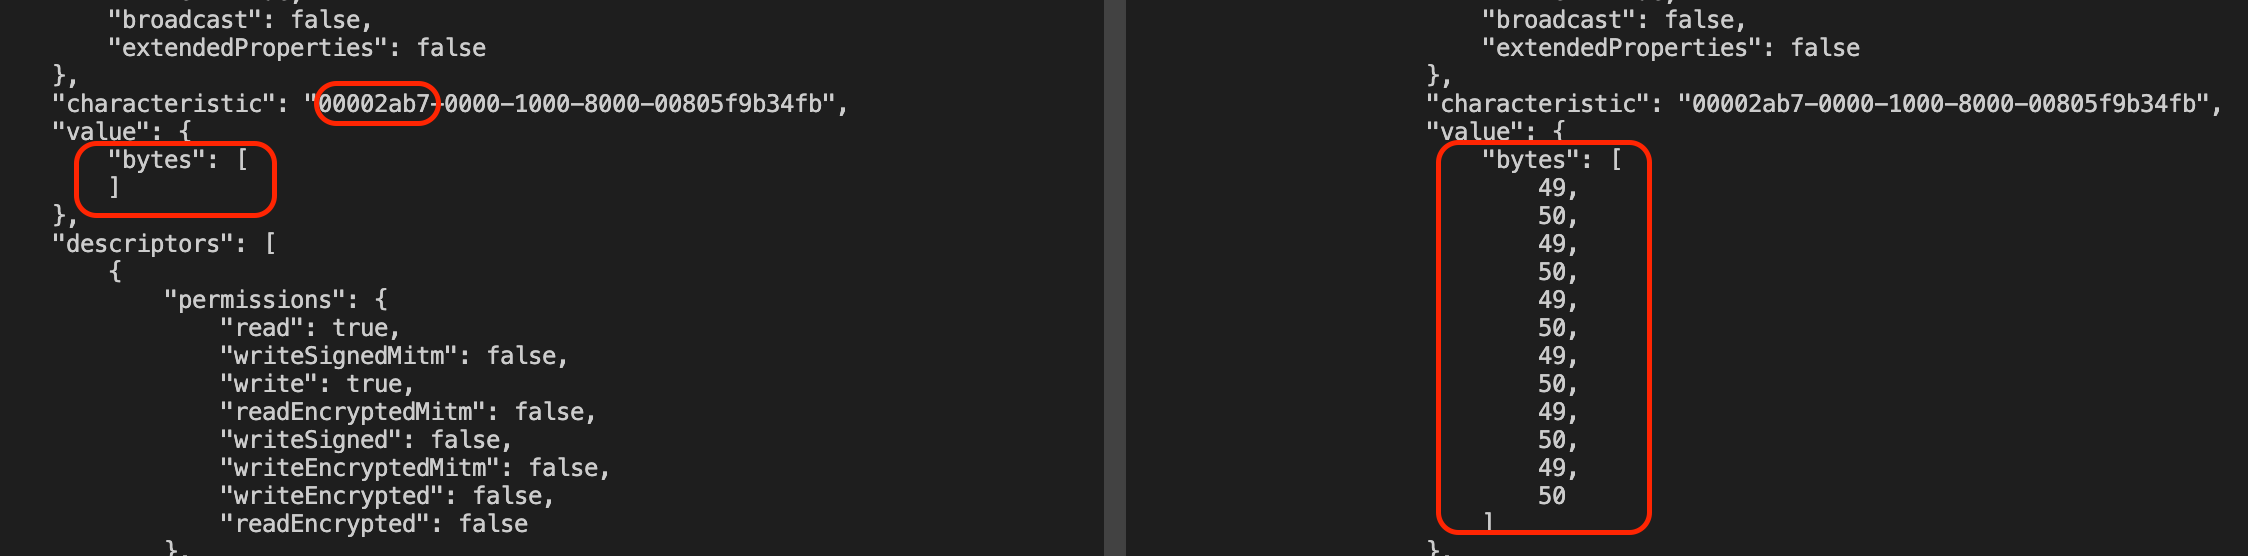
Go back to your smartphone. Tab the service (UUID: FEB8). Find the characteristic (UUID: 2AB7) and then tab the write button (↑).
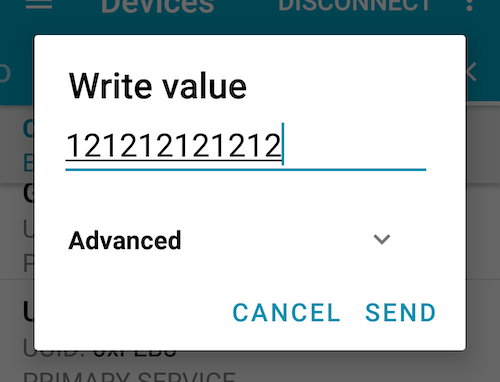
Type any words and tab SEND.
Go back to the webOS device and execute the getServices method again.
You can see "value" > "bytes" is changed by the sent data from your smartphone. (Left: before sending the data, Right: after sending the data)
This profile defines the way how the gateway device calls using hand-free devices.
Turn Bluetooth on. Note down the “adapterAddress” value.
luna-send -f -n 1 luna://com.webos.service.bluetooth2/adapter/setState '{"powered":true}'

# Example return for a successful call
{
    "adapterAddress": "b8:27:eb:a4:5c:4e", # Bluetooth MAC address of the webOS device. Note down this value.
    "returnValue": true
}
Make the webOS device discoverable.
# For "adapterAddress", use the value from the step 1.
luna-send -f -n 1 luna://com.webos.service.bluetooth2/adapter/setState '{"adapterAddress": "b8:27:eb:a4:5c:4e","discoverable":true}'

# Example return for a successful call
{
    "adapterAddress": "b8:27:eb:a4:5c:4e",
    "returnValue": true
}
Subscribe a status of the HFP connection. Keep this shell open. (#1 shell)
luna-send -i -f luna://com.webos.service.hfp/hf/getStatus '{"subscribe" : true}'

# Example return for a successful call
{
    "subscribed": true,
    "returnValue": true,
    "audioGateways": [
    ]
}
Go to your smartphone. Pair and connect with the webOS device. Then the below response will be shown in the #1 shell. Note down the “address” value.
# Return for a successful connection
{
    "subscribed": true,
    "returnValue": true,
    "audioGateways": [
        {
            "sco": false,
            "networkStatus": "unknown",
            "signal": -1,
            "operatorName": "",
            "battery": 2,
            "adapterAddress": "b8:27:eb:a4:5c:4e",
            "ring": false,
            "volume": 9,
            "address": "a8:34:6a:12:e5:ab" # Bluetooth MAC addres of your smartphone. Note down this value.
        }
    ]
}
Go back to the webOS device. Open a new shell and make a phone call using the hf/call method.
luna-send -f -n 1 luna://com.webos.service.hfp/hf/call '{"adapterAddress": "b8:27:eb:a4:5c:4e","address":"a8:34:6a:12:e5:ab", "number":"01012345678"}'

# Example return for a successful call
{
    "address":"a8:34:6a:12:e5:ab",
    "returnValue": true
}
"adapterAddress": from the step 1"address": from the step 4"number": Any valid phone numberThen a phone call will be made through your smartphone.
This profile is to exchange messages between Bluetooth devices.
Turn Bluetooth on. Note down the “adapterAddress” value.
luna-send -f -n 1 luna://com.webos.service.bluetooth2/adapter/setState '{"powered":true}'

# Example return for a successful call
{
    "adapterAddress": "b8:27:eb:a4:5c:4e", # Bluetooth MAC addres of the webOS device. Note down this value.
    "returnValue": true
}
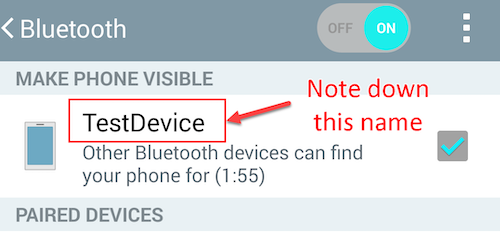
Set your smartphone discoverable. Note down the name of your smartphone.
Go back to the webOS device and discover your smartphone.
# Start to discover.
luna-send -f -n 1 luna://com.webos.service.bluetooth2/adapter/startDiscovery '{}'

# Example return for a successful call
{
    "adapterAddress": "b8:27:eb:a4:5c:4e", # Bluetooth MAC address of the webOS device
    "returnValue": true
}
Using the name from the step 2, find the information of your smartphone. Then note down the “address” value. You can use the grep command to simplify the list.
# For "adapterAddress", use the value from the step 1. Use the name and grep command.
luna-send -i -f luna://com.webos.service.bluetooth2/device/getStatus '{"adapterAddress": "b8:27:eb:a4:5c:4e","subscribe": true}' | grep "TestDevice" -C 70
{
    "subscribed": true,
    "returnValue": true,
    "devices": [
        {
            "classOfDevice": 6160908,
            "manufacturerData": {
            },
            "blocked": false,
            "scanRecord": [
            ],
            "connectedRoles": [
            ],
            "paired": true,
            "name": "TestDevice\n",  # Name from the step 2

            ...

            "rssi": -57,
            "pairing": false,
            "trusted": false,
            "adapterAddress": "b8:27:eb:a4:5c:4e",
            "typeOfDevice": "bredr",
            "connectedProfiles": [
            ],
            "address": "50:55:27:73:72:1c"   # Bluetooth MAC address of your smartphone. Note down this value.
        },
Quit the discovery.
# Cancel the discovery.
luna-send -f -n 1 luna://com.webos.service.bluetooth2/adapter/cancelDiscovery '{}'

# Example return for a successful call
{
    "adapterAddress": "b8:27:eb:a4:5c:4e",
    "returnValue": true
}
Pair the webOS device with your smartphone. After "request": "endPairing" shows, you can quit the process. (Press Ctrl + C.)
# For "adapterAddress", use the value from the step 1. For "address", use the value from the step 4.
luna-send -i -f luna://com.webos.service.bluetooth2/adapter/pair '{ "adapterAddress": "b8:27:eb:a4:5c:4e" ,"address":"50:55:27:73:72:1c", "subscribe":true}'

# Example return for a successful call
{
    "adapterAddress": "b8:27:eb:a4:5c:4e",
    "subscribed": true,
    "returnValue": true
}
{
    "adapterAddress": "b8:27:eb:a4:5c:4e",
    "subscribed": false,
    "returnValue": true,
    "request": "endPairing" # After this message is displayed, you can close this shell.
}
Connect the webOS device with your smartphone. Note down the “sessionId” value. Keep this shell open. (#1 shell)
# For "adapterAddress", use the value from the step 1. For "address", use the value from the step 4.
luna-send -i -f luna://com.webos.service.bluetooth2/map/connect '{"adapterAddress": "b8:27:eb:a4:5c:4e","address": "50:55:27:73:72:1c","instanceName":"SMS/MMS","subscribe":true}'
{
    "subscribed": true,
    "returnValue": true,
    "adapterAddress": "b8:27:eb:a4:5c:4e",
    "address": "50:55:27:73:72:1c",
    "sessionId": "session0",    # Note down this value.
    "instanceName": "SMS/MMS"
}
Open a new shell and monitor the message status. Keep this shell open. (#2 shell)
# For "sessionId", use the value from the step 7.
luna-send -i -f luna://com.webos.service.bluetooth2/map/getMessageNotification '{"adapterAddress": "b8:27:eb:a4:5c:4e","address": "50:55:27:73:72:1c","sessionId":"session0","subscribe":true}'
{
    "adapterAddress": "b8:27:eb:a4:5c:4e",
    "returnValue": true,
    "sessionId": "session0",
    "address": "50:55:27:73:72:1c",
    "subscribed": true
}
Open a new shell and set a folder for message.
luna-send -f -n 1 luna://com.webos.service.bluetooth2/map/setFolder '{"adapterAddress": "b8:27:eb:a4:5c:4e","address": "50:55:27:73:72:1c","sessionId":"session0","folder":"telecom/msg/"}'
{
    "adapterAddress": "b8:27:eb:a4:5c:4e",
    "returnValue": true,
    "address": "50:55:27:73:72:1c",
    "instanceName": "SMS/MMS"
}
Create a sample message file in /media/internal/ directory. For an actual test, please use a valid phone number for TEL.
# /media/internal/sample_message_file
BEGIN:BMSG
VERSION:1.0
STATUS:READ
TYPE:SMS_GSM
FOLDER:telecom/msg/SENT
BEGIN:BENV
BEGIN:VCARD
VERSION:3.0
FN:Abc
N:CDE
TEL:+821234567890     # Use a valid number.
END:VCARD
BEGIN:BBODY
CHARSET:UTF-8
LENGTH:29
BEGIN:MSG
Good Morning
END:MSG
END:BBODY
END:BENV
END:BMSG
Send a message.
luna-send -f -n 1 luna://com.webos.service.bluetooth2/map/pushMessage '{"adapterAddress": "b8:27:eb:a4:5c:4e","address": "50:55:27:73:72:1c","sessionId":"session0" , "sourceFile":"/media/internal/sample_message_file","folder":"outbox" }'
{
    "adapterAddress": "b8:27:eb:a4:5c:4e",
    "returnValue": true,
    "handle": "message18014398509482000",
    "address": "50:55:27:73:72:1c"
}
Then new return values will be displayed in #2 shell.
{
    "adapterAddress": "b8:27:eb:a4:5c:4e",
    "messages": {
        "properties": {
            "folder": "/telecom/msg/sent",
            "type": "sms-gsm"
        },
        "handle": "message18014398509482000"
    },
    "returnValue": true,
    "subscribed": true,
    "address": "50:55:27:73:72:1c",
    "notificationType": "SendingSuccess",
    "sessionId": "session0"
}
This profile is to exchange phone book objects between Bluetooth devices.
Turn Bluetooth on. Note down the “adapterAddress” value.
luna-send -f -n 1 luna://com.webos.service.bluetooth2/adapter/setState '{"powered":true}'

# Example return for a successful call
{
    "adapterAddress": "b8:27:eb:a4:5c:4e", # Bluetooth MAC address of the webOS device. Note down this value.
    "returnValue": true
}
Set your smartphone discoverable. Note down the name of your smartphone.
Go back to the webOS device and discover your smartphone.
# Start to discover
luna-send -f -n 1 luna://com.webos.service.bluetooth2/adapter/startDiscovery '{}'

# Example return for a successful call
{
    "adapterAddress": "b8:27:eb:a4:5c:4e", # Bluetooth MAC address of the webOS device
    "returnValue": true
}
Using the name from the step 2, find the information of your smartphone. Then note down the “address” value. You can use the grep command to simplify the list.
# For "adapterAddress", use the value from the step 1. Use the name from the step 2 and grep command.
luna-send -i -f luna://com.webos.service.bluetooth2/device/getStatus '{"adapterAddress": "b8:27:eb:a4:5c:4e","subscribe": true}' | grep "TestDevice" -C 70
{
    "subscribed": true,
    "returnValue": true,
    "devices": [
        {
            "classOfDevice": 6160908,
            "manufacturerData": {
            },
            "blocked": false,
            "scanRecord": [
            ],
            "connectedRoles": [
            ],
            "paired": true,
            "name": "TestDevice\n",  # Name from the step 2

            ...

            "rssi": -57,
            "pairing": false,
            "trusted": false,
            "adapterAddress": "b8:27:eb:a4:5c:4e",
            "typeOfDevice": "bredr",
            "connectedProfiles": [
            ],
            "address": "50:55:27:73:72:1c"   # Bluetooth MAC address of your smartphoen. Note down this value.
        },
Quit the discovery.
# Cancel the discovery
luna-send -f -n 1 luna://com.webos.service.bluetooth2/adapter/cancelDiscovery '{}'

# Example return for a successful call
{
    "adapterAddress": "b8:27:eb:a4:5c:4e",
    "returnValue": true
}
Pair the webOS device with your smartphone. After "request": "endPairing" shows, you can quit the process. (Press Ctrl + C.)
luna-send -i -f luna://com.webos.service.bluetooth2/adapter/pair '{ "adapterAddress": "b8:27:eb:a4:5c:4e" ,"address":"50:55:27:73:72:1c", "subscribe":true}'

# Example return for a successful call
{
    "adapterAddress": "b8:27:eb:a4:5c:4e",
    "subscribed": true,
    "returnValue": true
}
{
    "adapterAddress": "b8:27:eb:a4:5c:4e",
    "subscribed": false,
    "returnValue": true,
    "request": "endPairing" # After this message is displayed, you can close this shell.
}
Connect the webOS device with your smartphone. Keep this shell open. (#1 shell)
luna-send -i -f luna://com.webos.service.bluetooth2/pbap/connect '{ "adapterAddress": "b8:27:eb:a4:5c:4e" ,"address":"50:55:27:73:72:1c", "subscribe":true}'
{
    "subscribed": true,
    "returnValue": true,
    "adapterAddress": "b8:27:eb:a4:5c:4e",
    "address": "50:55:27:73:72:1c"
}
Open a new shell and get a list of phone book objects. Keep this shell open. (#2 shell)
luna-send -f -n 1 luna://com.webos.service.bluetooth2/pbap/setPhoneBook '{"adapterAddress": "b8:27:eb:a4:5c:4e" ,"address":"50:55:27:73:72:1c" , "repository":"internal", "object":"ich"}'
{
    "adapterAddress": "b8:27:eb:a4:5c:4e",
    "returnValue": true,
    "address": "50:55:27:73:72:1c"
}
List phone book objects and choose the object you want to copy. Note down the “Handle” value.
luna-send -i -f luna://com.webos.service.bluetooth2/pbap/vCardListing '{"adapterAddress": "b8:27:eb:a4:5c:4e" ,"address":"50:55:27:73:72:1c"}'
{
    "adapterAddress": "b8:27:eb:a4:5c:4e",
    "returnValue": true,
    "address": "50:55:27:73:72:1c",
    "vcfHandles": [
        {
            "Handle": "0.vcf",
            "Name": "Lg Lg"
        },
        {
            "Handle": "1.vcf", # Choose any Handle value and note it down.
            "Name": "PBAP"
        },
        {
            "Handle": "2.vcf",
            "Name": "pbap2"
        }
    ]
}
Copy the phone book object from the step 9.
luna-send -f -n 1 luna://com.webos.service.bluetooth2/pbap/pullvCard  '{"adapterAddress": "b8:27:eb:a4:5c:4e" ,"address":"50:55:27:73:72:1c", "destinationFile":"1.vcf", "vCardHandle":"1.vcf", "vCardVersion":"3.0"}'
{
    "adapterAddress": "b8:27:eb:a4:5c:4e",
    "returnValue": true,
    "address": "50:55:27:73:72:1c",
    "destinationFile": "/media/internal/pbap/50_55_27_73_72_1c/internal/pb/1.vcf"
}
Check the copied object.
cat /media/internal/pbap/50_55_27_73_72_1c/internal/pb/1.vcf

# Example return for the cat command
BEGIN:VCARD
VERSION:3.0
N:;PBAP;;;
FN:PBAP
TEL;TYPE=CELL:1234-56789
END:VCARD
This profile is to send object data such as pictueres, virtual business cards, etc. Using this profile, you can send the data to unpaired Bluetooth devices.
Turn Bluetooth on. Note down the “adapterAddress” value.
luna-send -f -n 1 luna://com.webos.service.bluetooth2/adapter/setState '{"powered":true}'

# Example return for a successful call
{
    "adapterAddress": "b8:27:eb:a4:5c:4e", # Bluetooth MAC address of the webOS device. Note down this value.
    "returnValue": true
}
Set the name of the webOS device.
luna-send -f -n 1 luna://com.webos.service.bluetooth2/adapter/setState '{"name":"oppTest"}'

# Example return for a successful call
{
    "adapterAddress": "b8:27:eb:a4:5c:4e", # Bluetooth MAC address of the webOS device
    "returnValue": true
}
Make the webOS device discoverable.
luna-send -f -n 1 luna://com.webos.service.bluetooth2/adapter/setState '{"discoverable":true}'

# Example return for a successful call
{
    "adapterAddress": "b8:27:eb:a4:5c:4e", # Bluetooth MAC address of the webOS device
    "returnValue": true
}
Go to your smartphone and turn Bluetooth on. Find the name you set up in the step 2.
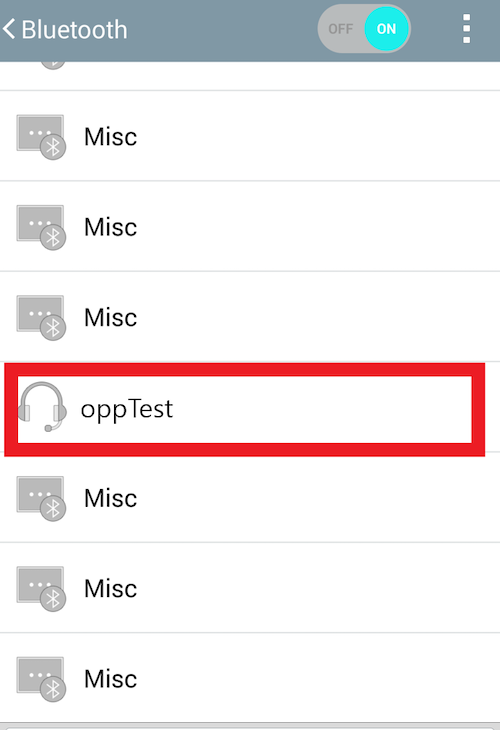
Tab the name to connect.
Call a method for file transfer. Keep this shell open. (#1 shell)
luna-send -i -f luna://com.webos.service.bluetooth2/opp/awaitTransferRequest '{"subscribe":true}'

# Example return for a successful call
{
    "adapterAddress": "b8:27:eb:a4:5c:4e", # Bluetooth MAC address of the webOS device
    "subscribed": true,
    "returnValue": true
}
Open a new shell to monitor the file transfer. Keep this shell open. (#2 shell)
luna-send -i -f luna://com.webos.service.bluetooth2/opp/monitorTransfer '{"subscribe":true}'

# Example return for a successful call
{
    "adapterAddress": "b8:27:eb:a4:5c:4e", # Bluetooth MAC address of the webOS device
    "subscribed": true,
    "returnValue": true
}
Go to your smartphone and send an image file to the webOS device using Bluetooth sharing.
If a request for file transfer succeeds, the following returns are displayed on #1 shell. Note down the “requestId” value.
# Subscription return for awaitTransferRequest method
{
    "request": {
        "requestId": "001",   # Note down this value.
        "adapterAddress": "b8:27:eb:a4:5c:4e",
        "address": "50:55:27:73:72:1C", # Bluetooth MAC address of your smartphone
        "fileName": "test-image-for-opp.png",
        "fileSize": 136878,
        "name": "your-smart-phone"  # The name of your smartphone
    }
}
Open a new shell and accept the request for the file transfer.
# For "requestId", use the value from the step 8.
luna-send -f -n 1 luna://com.webos.service.bluetooth2/opp/acceptTransferRequest '{"requestId":"001"}'

# Example return for a successful call
{
    "adapterAddress": "b8:27:eb:a4:5c:4e",
    "subscribed": false,
    "returnValue": true
}
If opp/acceptTransferRequest succeeds, the information of transferred file will be displayed on the #2 shell.
# Subscription returns of monitorTransfer method
{
    "subscribed": true,
    "returnValue": true,
    "adapterAddress": "b8:27:eb:a4:5c:4e",
    "transfers": [
        {
            "adapterAddress": "b8:27:eb:a4:5c:4e",
            "requestId": "001",
            "transferred": 0,
            "fileName": "test-image-for-opp.png",
            "address": "50:55:27:73:72:1C",
            "name": "your-smart-phone",
            "fileSize": 136878
        }
    ]
}
The transferred file will be located in /media/internal/ directory of the webOS device.
This profile is to replace the RS-232 serial communication. Using this profile, you can use the serial communication using Bluetooth.
Turn Bluetooth on.
luna-send -f -n 1 luna://com.webos.service.bluetooth2/adapter/setState '{"powered":true}'

# Example return for a successful call
{
    "adapterAddress": "b8:27:eb:a4:5c:4e", # Bluetooth MAC address of the webOS device
    "returnValue": true
}
Set the name of the webOS device.
# Set a name for the peripheral device
luna-send -f -n 1 luna://com.webos.service.bluetooth2/adapter/setState '{"name":"sppTest"}'

# Example return for a successful call
{
    "adapterAddress": "b8:27:eb:a4:5c:4e", # Bluetooth MAC address of the webOS device
    "returnValue": true
}
Make the webOS device discoverable.
luna-send -f -n 1 luna://com.webos.service.bluetooth2/adapter/setState '{"discoverable":true}'

# Example return for a successful call
{
    "adapterAddress": "b8:27:eb:a4:5c:4e", # Bluetooth MAC address of the webOS device
    "returnValue": true
}
Go to your smartphone and turn Bluetooth on. Find the device you set up in step 2.
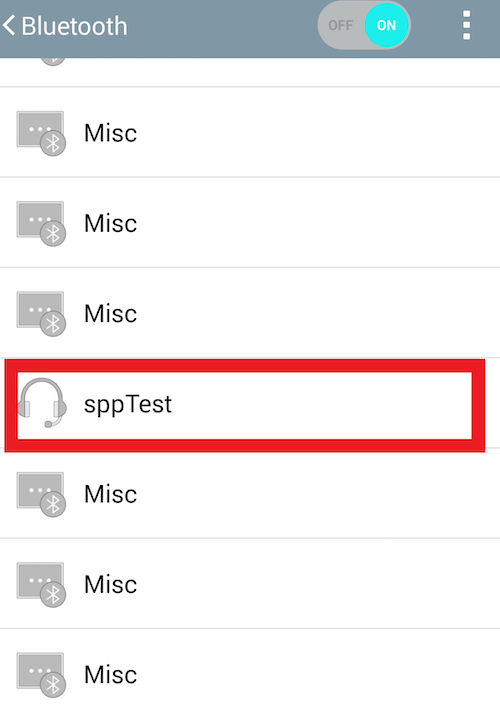
Tab the name to connect.
Go back to the webOS device and check the connection.
luna-send -f -n 1 luna://com.webos.service.bluetooth2/device/getStatus '{ "subscribe": true }' | grep "LG Mobile" -C 15

# Example return for a successful call
{
	...

    "pairing": false,
    "rssi": 0,
    "name": "sppTest",
    "address": "50:55:27:73:72:1c",
    "paired": true,                   # Check this value set to true
    "typeOfDevice": "bredr",
    "manufacturerData": {
    },
    "adapterAddress": "b8:27:eb:a4:5c:4e",

	...
}
Create an SPP channel. Keep this shell open. (#1 shell)
luna-send -i -f -a "com.luna.test" luna://com.webos.service.bluetooth2/spp/createChannel '{ "name":"service1", "uuid":"00001101-0000-1000-8000-00805f9b34fb", "subscribe":true }'

# Example return for a successful call
{
    "adapterAddress": "b8:27:eb:a4:5c:4e",
    "subscribed": true,
    "returnValue": true
}
Go to your smartphone and run the Bluetooth SPP Manager app.
Tab DEVICES > Search Devices. Then a list of nearby Bluetooth devices will be displayed. Tab the name you set in the step 2 (sppTest). Then you can see the message Connection established is displayed.
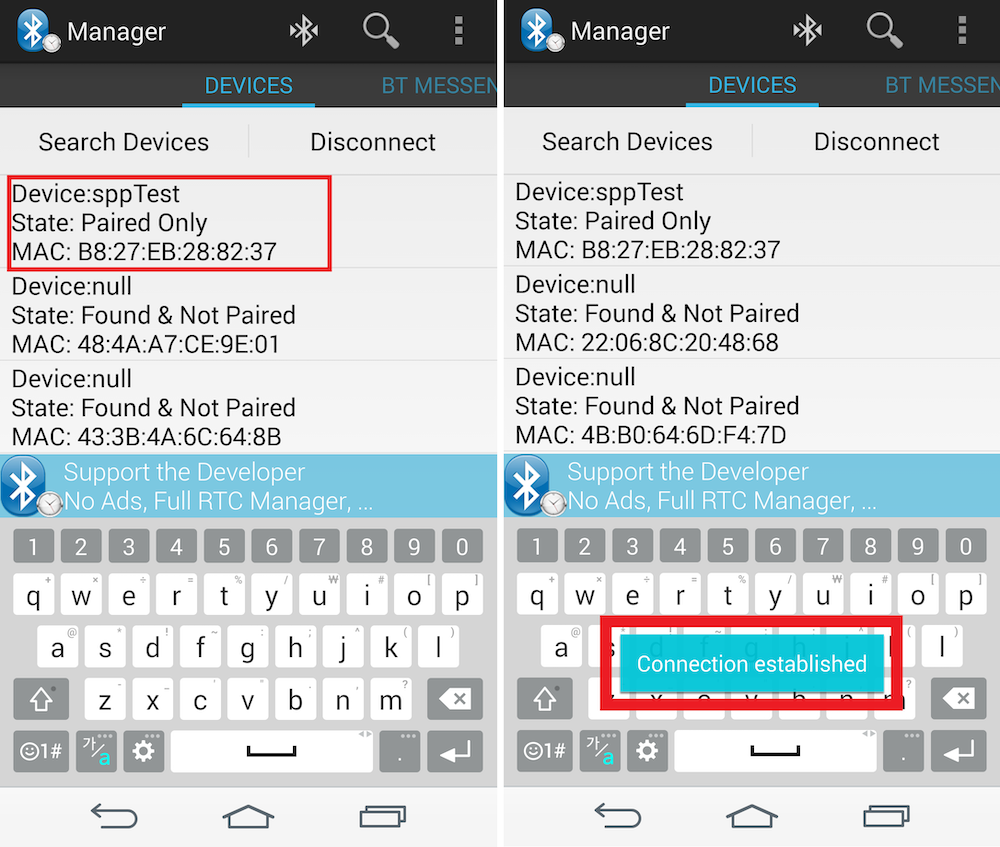
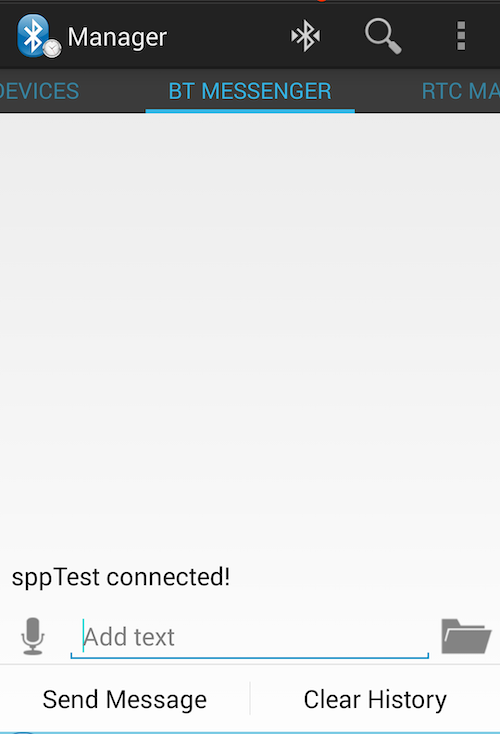
Move to BT MESSENGER tab. You can see the message sppTest connected is displayed on the screen.
Go back to the #1 shell and note down the “channelId” value.
# Existing return values
{
    "adapterAddress": "b8:27:eb:a4:5c:4e",
    "subscribed": true,
    "returnValue": true
}
{ # Newly added return values
    "channelId": "001",    # Note down this value
    "adapterAddress": "b8:27:eb:a4:5c:4e",
    "subscribed": true,
    "connected": true,
    "address": "50:55:27:73:72:1C",    # Bluetooth MAC address of your smartphone
    "returnValue": true
}
Open a new shell and set the webOS device as read mode. Keep this shell open. (#2 shell)
# For "channelId", use the value from the step 10.
luna-send -i -a "com.luna.test" -f luna://com.webos.service.bluetooth2/spp/readData '{ "channelId": "001","subscribe": true}'
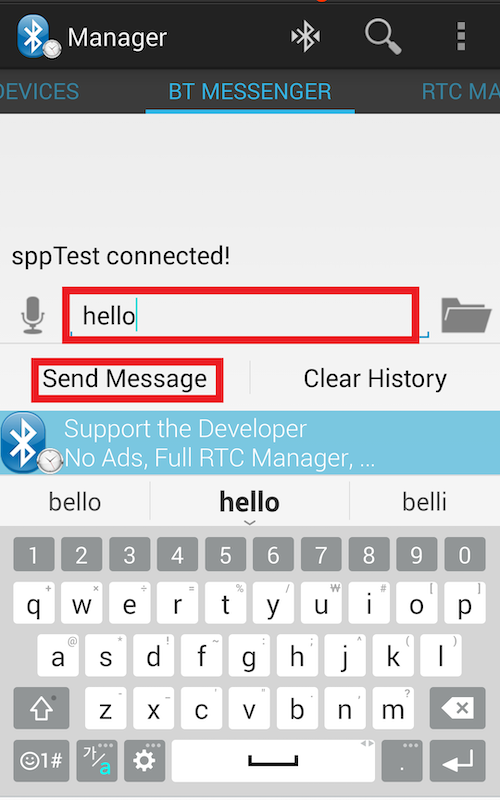
Go to Bluetooth SPP Manager app > BT MESSENGER > Add text and enter the message. Tab Send Message.
Go back to the #2 shell. You can check the sent message in base64 format.
{
    "channelId": "001",
    "adapterAddress": "b8:27:eb:a4:5c:4e",
    "subscribed": true,
    "returnValue": true,
    "data": "aGVsbG8K"          # A base64 encoded string for 'hello'
}
Press Ctrl + C to quit the read mode. Send a message using write mode.
# For "data", write the message in base64 format.
luna-send -f -n 1 -a "com.luna.test" luna://com.webos.service.bluetooth2/spp/writeData '{ "channelId": "001","data": "aGVsbG8NCg0K"}'

# Example return for a successful call
{
    "adapterAddress": "b8:27:eb:a4:5c:4e",
    "returnValue": true
}
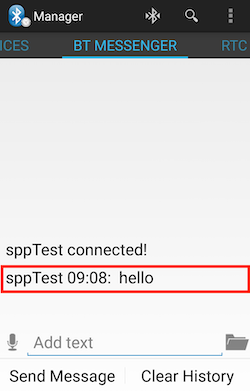
You can check the sent message on the BT MESSENGER tab.
Contents