A downloadable JavaScript (JS) service is a 3rd party JS service that can be installed on the webOS target device.
Downloadable vs. Built-In
In webOS OSE, apps and services can be classified into two types based on how they are installed on the target device.
Downloadable apps/services are installed by the appinstalld service. The appinstalld service creates webOS configurations based on files created by developers. (such as trust level) Developers can modify only certain parts of the app/service settings.
Built-in apps/services are built and installed by developers. Developers can customize app/service’s configurations to suit their needs.
This tutorial shows a step-by-step guide for creating a downloadable JS service from scratch.
After installing the CLI, you must register your target device. Enter the ares-setup-device command to start an interactive mode:
Note In the interactive mode, pressing the Enter key means to use the default value.
document@document:~$ ares-setup-device
name deviceinfo connection profile
------------------ ------------------------ ---------- -------
emulator (default) developer@127.0.0.1:6622 ssh ose
** You can modify the device info in the above list, or add new device.
? Select add # Select 'add'.? Enter Device Name: webos # The nickname of your target device. Use the short name.? Enter Device IP address: 127.0.0.1 # The IP address of your target device? Enter Device Port: 22# Just press the Enter key. Do not change this value.? Enter ssh user: root # Just press the Enter key. Do not change this value.? Enter description: new device # Descriptions about your target device? Select authentication password # Select 'password'? Enter password: [hidden]# Leave it blank (Press the Enter key).? Set default ? No # Enter 'y' if you want to set this device as the default device.? Save ? Yes # Enter 'Yes'.name deviceinfo connection profile
------------------ ------------------------ ---------- -------
webos root@127.0.0.1:22 ssh ose
emulator (default) developer@127.0.0.1:6622 ssh ose
Step 01. Creating a Dummy App and Service
Let’s get started by creating a dummy app and service from templates. CLI provides various templates for webOS apps and services.
App
webOS OSE’s service requires an app to be packaged with. In this tutorial, we will use a web app.
Since this JS service is dynamic, it will be terminated automatically after a certain amount of time (5 seconds). For more information about the dynamic service, see Static and Dynamic Services.
Debugging the Service
Node’s Inspector is used to debug a JS service.
By communicating with it on the host machine, Node’s Inspector lets you observe variable values and control JavaScript execution.
Note
Please do not be confused with the legacy node-inspector, which has been deprecated as of Node 7.7.0. See Legacy Debugger | Node.js for details.
For more information on Node.js debugging using the Inspector, refer to the Debugging Guide | Node.js.
To start the Inspector on a webOS device, use the ares-inspect command. For detailed usage of the command, see ares-inspect.
If the command succeeds, a URL for Node’s Inspector will be returned.
ares-inspect --device webos --service com.domain.app.service
[Info] Set target device : rpir
To debug your service, set"127.0.0.1:63532" on Node's Inspector Client(Chrome DevTools, Visual Studio Code, etc.).
To start the debugging window, you need a client tool to connect to the Inspector. For a list of tools that can connect to Node’s Inspector, see Inspector Clients | Node.js.
In this tutorial, we will use the Chrome DevTools as the client tool.
Copy the URL in the above return.
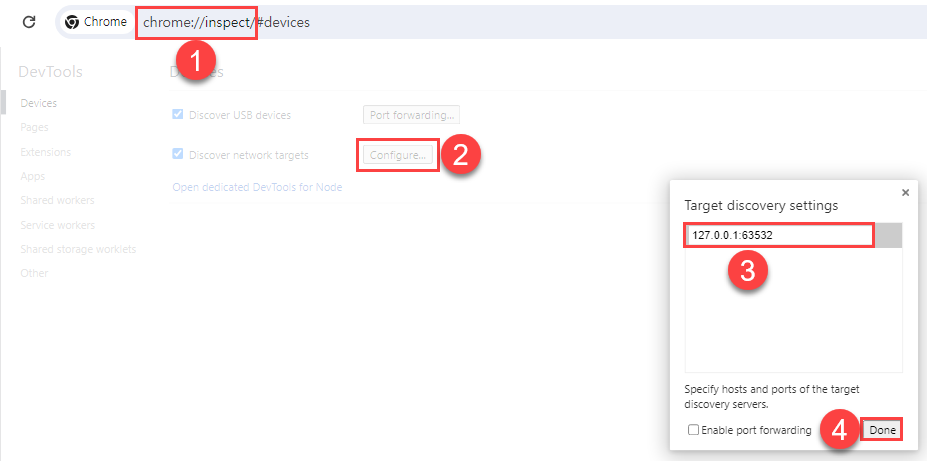
Open the Chrome browser.
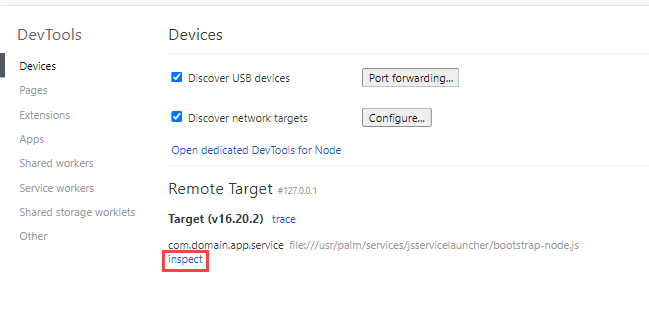
Go to ‘chrome://inspect’ and do the followings:
Click inspect.
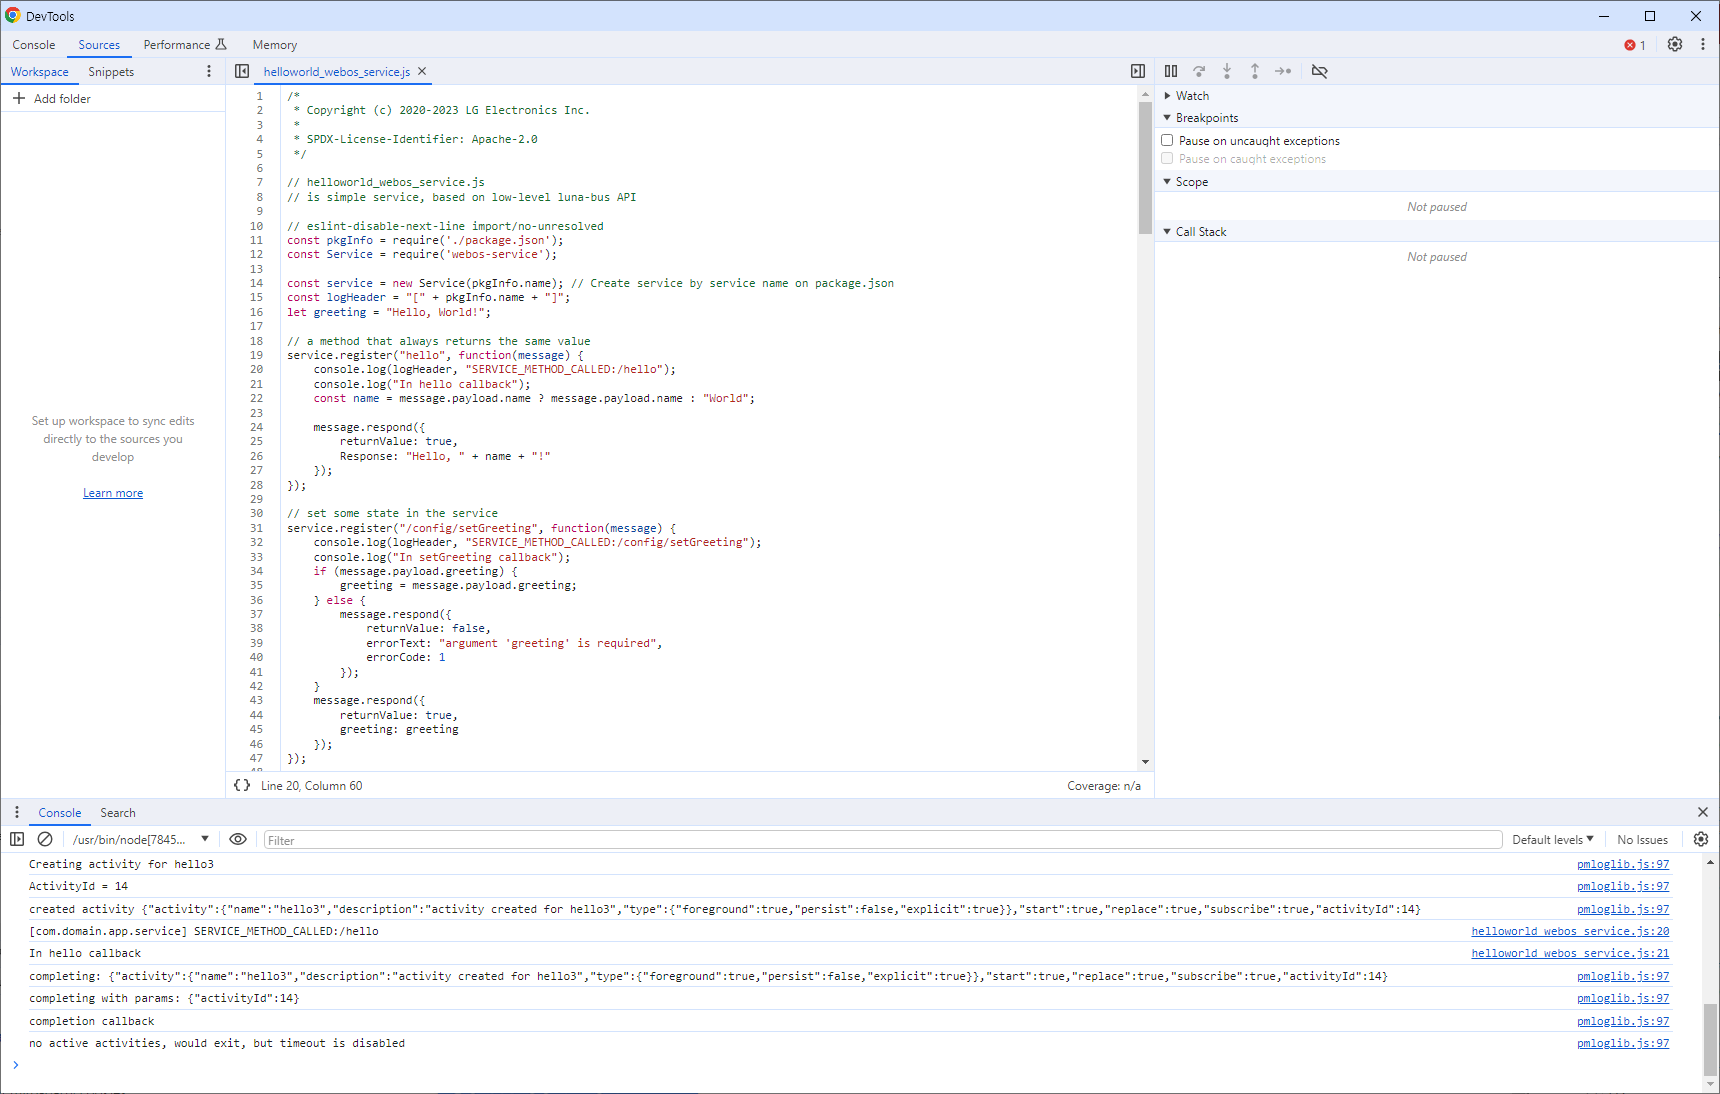
Then, the debugging window will be displayed.
Appendix. Code Explanation
This section explains the sample source codes in this tutorial.
helloclient.js
helloworld_webos_service.js shows a typical way to call a service on webOS.
const pkgInfo = require('./package.json');
const Service = require('webos-service'); // webos-service module provides an interface for the webOS system bus.
// The interface is wrapped in a familiar Node.js idiom.
const service =new Service(pkgInfo.name); // Create service by service name on package.json
const logHeader ="["+ pkgInfo.name +"]";
...
// The hello method returns "Hello, <name>!" to the client
service.register("hello", function(message) {
console.log(logHeader, "SERVICE_METHOD_CALLED:/hello");
console.log("In hello callback");
const name = message.payload.name ? message.payload.name :"World";
message.respond({
returnValue:true,
Response:"Hello, "+ name +"!" });
});
...
services.json
services.json stores the metadata of the service.
{
"id": "com.domain.app.service", // An ID of the "services" array. Typically, this value is the "name" of the first object of the "services" array.
"description": "HelloWorld Service",
"services": [
{
"name": "com.domain.app.service"// A unique identifier of the service.
// This value MUST START with the app ID, which is packaged with the service.
// For example, if the app ID is com.domain.app, the service ID must start with com.domain.app.xxx. (e.g., com.domain.app.service)
}
]
}
{
"name": "com.domain.app.service", // A unique identifier of the service. This is the same value as the "name" in services.json.
"version": "1.0.0",
"description": "Helloworld service",
"main": "helloworld_webos_service.js", // The main JS file for this service
"scripts": {
"test": "echo \"Error: no test specified\" && exit 1" },
"author": "",
"license": "BSD"}